Adding TypeScript Types to GitHub's GraphQL API
GitHub’s GraphQL API is powerful, especially for implementing custom automation and developer tooling. Check out the Explorer to play around with some queries and mutations in their live GraphiQL environment if you’ve never used it before.
When interacting with the GitHub GraphQL API in TypeScript, it would be nice to
leverage the power of types to understand the structure of queries, mutations, variables, and responses. Luckily, with a
little glue code between graphql-codegen and GitHub’s published schema
@octokit/graphql-schema, we can add types to all of our interactions with
the API.
If you’re looking for the TLDR, the complete sample code is available on GitHub.
Prerequisites
If you don’t already have a TypeScript / GraphQL repository initialized, go ahead and create one.
mkdir my-typescript-projectcd my-typescript-projectnpm init -ynpm install --save graphqlnpm install --save-dev typescript ts-nodenpx tsc --initGenerating Types from the GitHub GraphQL Schema
To start, we’ll generate types from the GitHub GraphQL schema, provided by
@octokit/graphql-schema. We’ll need to install the schema package and
graphql-codegen.
npm install --save-dev @octokit/graphql-schema @graphql-codegen/cliNext, we’ll use the graphql-codegen
wizard to configure our initial
code generation config.
npx graphql-codegen init Welcome to GraphQL Code Generator! Answer few questions and we will setup everything for you.? What type of application are you building? (Use arrow keys)❯ Backend - API or server Application built with Angular Application built with React Application built with Stencil Application built with Vue Application using graphql-request Application built with other framework or vanilla JSSelect the type of app you’re building. For this tutorial, we’ll demo a Backend - API or server. Highlight “Backend -
API or server”, press the space bar to select it, and press enter.
? Where is your schema?: src/generated/github-schema-loader.tsWe’ll point graphql-codegen at the schema published by
@octokit/graphql-schema that we installed earlier. For now, type
src/generated/github-schema-loader.ts and press enter. We’ll create that file in a subsequent step.
? Pick plugins: (Press <space> to select, <a> to toggle all, <i> to invert selection) ◉ TypeScript (required by other typescript plugins) ◉ TypeScript Resolvers (strongly typed resolve functions) ◯ TypeScript MongoDB (typed MongoDB objects)❯◉ TypeScript GraphQL document nodes (embedded GraphQL document)I like to write distinct GraphQL files for improved IDE support. To support this workflow, we want to use
typescript-document-nodes. To do so, use
the down arrow key to select “TypeScript GraphQL document nodes (embedded GraphQL document)”, press space and then press
enter.
? Where to write the output: (src/generated/graphql.ts)In this case, the default suggestion (src/generated/graphql.ts) is just fine. Press enter to continue.
? Do you want to generate an introspection file? (Y/n) nFor this demo, we won’t need an introspection file. Type n and press
enter.
? How to name the config file? (codegen.ts)Naming the graphql-codegen configuration file codegen.ts (the default indicated above) is fine with me. Press enter
to continue.
? What script in package.json should run the codegen? codegenThis will create an entry in the package.json scripts object. I like to use codegen. Type codegen and press
enter.
Config file generated at codegen.ts
  $ npm install
To install the plugins.
  $ npm run codegen
To run GraphQL Code Generator.
Great, we’re all done with the wizard. Install all the plugins the wizard wrote to package.json’s devDependencies.
npm installNow, write the src/generated/github-schema-loader.ts file we referenced earlier. Create a file at
src/generated/github-schema-loader.ts and paste the following code:
import { schema } from "@octokit/graphql-schema";export default schema.json;This will load the schema up from the package published by GitHub,
@octokit/graphql-schema.
Finally, you’ll need to add ts-node/register to your codegen.ts file so the github-schema-loader.ts can be
transpiled. The file should look like this:
import type { CodegenConfig } from "@graphql-codegen/cli";
const config: CodegenConfig = {  overwrite: true,  schema: "src/generated/github-schema-loader.ts",  generates: {    "src/generated/graphql.ts": {      plugins: ["typescript", "typescript-resolvers", "typescript-document-nodes"],    },  },  // Add this line  require: ["ts-node/register"],};
export default config;
Now, run your first codegen!
npm run codegen> my-typescript-project@1.0.0 codegen /private/tmp/my-typescript-project> graphql-codegen --config codegen.ts
  ✔ Parse configuration  ✔ Generate outputs
Check out src/generated/graphql.ts. We’ve now got lots of GitHub-related types generated!
<trimmed>export type Repository = Node & ProjectOwner & RegistryPackageOwner & RegistryPackageSearch & Subscribable & Starrable & UniformResourceLocatable & RepositoryInfo & { __typename?: 'Repository'; /** A list of users that can be assigned to issues in this repository. */ assignableUsers: UserConnection; /** A list of branch protection rules for this repository. */ branchProtectionRules: BranchProtectionRuleConnection; /** Returns the code of conduct for this repository */ codeOfConduct?: Maybe<CodeOfConduct>; /** A list of collaborators associated with the repository. */ collaborators?: Maybe<RepositoryCollaboratorConnection>; /** A list of commit comments associated with the repository. */ commitComments: CommitCommentConnection; /** Identifies the date and time when the object was created. */ createdAt: Scalars['DateTime']; /** Identifies the primary key from the database. */ databaseId?: Maybe<Scalars['Int']>; /** The Ref associated with the repository's default branch. */ defaultBranchRef?: Maybe<Ref>; /** Whether or not branches are automatically deleted when merged in this repository. */ deleteBranchOnMerge: Scalars['Boolean']; /** A list of deploy keys that are on this repository. */ <trimmed>Checkpoint
If you ran into any problems following the steps above view Checkpoint #1 on GitHub.
Writing Queries and Mutations
Now that we have types generated let’s do something with them! We’ll write some simple GraphQL queries and mutations with added type safety. I like to keep my queries and mutations in their own folders, so create a directory for each:
mkdir -p src/mutations src/queriesAnd reference those directories in your codegen.ts file:
import type { CodegenConfig } from "@graphql-codegen/cli";
const config: CodegenConfig = {  overwrite: true,  schema: "src/generated/github-schema-loader.ts",  // Add this line  documents: ["src/mutations/*.graphql", "src/queries/*.graphql"],  generates: {    "src/generated/graphql.ts": {      plugins: ["typescript", "typescript-resolvers", "typescript-document-nodes"],    },  },  require: ["ts-node/register"],};
export default config;
For the next steps, you’ll also need a Classic GitHub Personal Access token with repo scope. If you don’t already have
one, create one in your settings. For help doing this, check out this
GitHub support page.
Create an Apollo Client
For this demo, I’ll use Apollo as my GraphQL client. Install Apollo and its dependencies:
npm install --save @apollo/client cross-fetchNow, we’ll write some boilerplate code to generate a GraphQL client. Create src/client.ts and paste this code:
import { ApolloClient, HttpLink, InMemoryCache, NormalizedCacheObject } from "@apollo/client/core";import fetch from "cross-fetch";
export function githubClient(): ApolloClient<NormalizedCacheObject> {  if (!process.env.GITHUB_TOKEN) {    throw new Error(      "You need to provide a GitHub personal access token as `GITHUB_TOKEN` env variable. See README for more info.",    );  }
  return new ApolloClient({    link: new HttpLink({      uri: "https://api.github.com/graphql",      headers: {        authorization: `token ${process.env.GITHUB_TOKEN}`,      },      fetch,    }),    cache: new InMemoryCache(),  });}
Don’t worry about understanding this code if it’s unfamiliar. All it’s doing is setting up a GraphQL client to use when communicating with the GitHub GraphQL API. You can use any other network client you like.
GraphQL Codegen TypeScript Operations
To add types to our queries, mutations, and variables, let’s add the
@graphql-codegen/typescript-operations plugin
to generate TypeScript classes from our .graphql files.
npm install --save-dev @graphql-codegen/typescript-operationsand reference it in your codegen.ts file under the plugins list.
generates: { "src/generated/graphql.ts": { plugins: [ "typescript", "typescript-resolvers", "typescript-document-nodes", "typescript-operations", // Add this line ], },},Writing A Query
Now, let’s write a simple query. Create src/queries/who-am-i.graphql and paste the following code:
query WhoAmI { viewer { login }}Since we have a new GraphQL query, run the codegen step to create create the appropriate TypeScript types.
npm run codegenThis viewer query will return your username (docs). Now, this is
where the generated types come in super-handy. Create an index file at src/index.ts and paste the following code:
import { githubClient } from "./client";import { WhoAmIQuery, WhoAmI } from "./generated/graphql";
async function whoAmI() {  const result = await githubClient().query<WhoAmIQuery>({    query: WhoAmI,  });
  return result.data.viewer.login;}
async function main() {  const username = await whoAmI();  console.info(`Your github username is ${username}`);}
main().catch((e) => console.error(e));
By providing the <WhoAmIQuery> type, TypeScript now understands the object that will be returned from the query. We
can also pass the query as WhoAmI, instead of writing our GraphQL statement in-line as a string.
When we run this code, we should see our username written out to the console. To run the code, you’ll need to provide
your GitHub token generated above as the GITHUB_TOKEN environment variable. In your terminal, run:
GITHUB_TOKEN=PASTE_YOUR_GITHUB_TOKEN_HERE npx ts-node src/index.ts
Your github username is blimmer
Pretty cool! But that was a lot of work, right? Things get more interesting when you add start working with variables and mutations.
Checkpoint
If you ran into any problems following the steps above view Checkpoint #2 on GitHub.
Writing a Mutation
Next, lets write a mutation that requires a variable to show the power of layer in types when communicating with the API.
Create src/mutations/add-star.graphql and paste the following code:
mutation AddStar($starrableId: ID!) { addStar(input: { starrableId: $starrableId }) { starrable { stargazers { totalCount } } }}This code will add a star on the repository ID you pass (docs).
Note that we’re using a GraphQL variable called starrableId that will
be set at runtime. Since we’ve added a .graphql file, we need to run codegen again.
npm run codegenLet’s update our src/index.ts to call this mutation.
import { githubClient } from "./client";import { WhoAmIQuery, WhoAmI, AddStarMutation, AddStarMutationVariables, AddStar } from "./generated/graphql";
async function whoAmI() {  const result = await githubClient().query<WhoAmIQuery>({    query: WhoAmI,  });
  return result.data.viewer.login;}
// !!! New Function !!!async function starRepo(repoId: string) {  const result = await githubClient().mutate<AddStarMutation, AddStarMutationVariables>({    mutation: AddStar,    variables: {      starrableId: repoId,    },  });
  if (result.errors) {    throw new Error("Mutation failed!");  }
  console.info(`The repository now has ${result.data?.addStar?.starrable?.stargazers.totalCount} stargazers!!`);}
async function main() {  const username = await whoAmI();  console.info(`Your github username is ${username}`);
  const benLimmerDotComRepoId = "MDEwOlJlcG9zaXRvcnkxMjUwOTk3OA==";  await starRepo(benLimmerDotComRepoId);}
main().catch((e) => console.error(e));
Note that we’ve added the starRepo method that calls our new mutation. By passing
<AddStarMutation, AddStarMutationVariables>, TypeScript will now ensure that we’re passing all the required variables
to the mutation, and that they’re of the correct type. This is great because it will help catch bugs before we even call
the GitHub API.
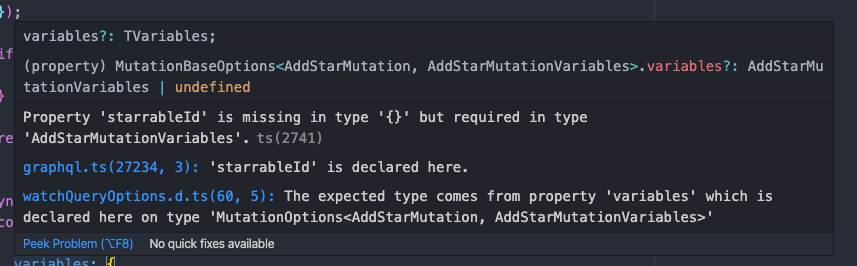
For example, if I don’t pass the required starrableId variable, I get a handy warning in my editor.
As before, let’s run this code. Note that, if you’re using the code as-is, you’ll add a star to the
blimmer/benlimmer.com public GitHub repository.
GITHUB_TOKEN=PASTE_YOUR_GITHUB_TOKEN_HERE ts-node src/index.tsYour github username is blimmerThe repository now has 7 stargazers!!Great! We just used the GitHub GraphQL API to add a star to my repository (thanks!)
Checkpoint
If you ran into any problems following the steps above view Checkpoint #3 on GitHub.
Combining a Query and a Mutation
The code above is great, but we hard-coded the ID of my repository, which maybe we don’t want to do.
const benLimmerDotComRepoId = "MDEwOlJlcG9zaXRvcnkxMjUwOTk3OA==";Let’s look up the repository ID at runtime, using the repository query, and use that for the mutation instead.
Create src/queries/get-repo-id.graphql and paste the following code:
query GetRepoId($owner: String!, $name: String!) { repository(owner: $owner, name: $name) { id }}This query takes two variables (owner and name) and will return the repository ID of the matching repo
(docs). Remember to npm run codegen since we created a new
.graphql file.
Let’s update index.ts to use the result of this query in the mutation. Paste the following code:
import { githubClient } from "./client";import {  WhoAmIQuery,  WhoAmI,  GetRepoId,  GetRepoIdQuery,  GetRepoIdQueryVariables,  AddStarMutation,  AddStarMutationVariables,  AddStar,} from "./generated/graphql";
async function whoAmI() {  const result = await githubClient().query<WhoAmIQuery>({    query: WhoAmI,  });
  return result.data.viewer.login;}
async function getBenLimmerDotComRepoId(): Promise<string> {  const result = await githubClient().query<GetRepoIdQuery, GetRepoIdQueryVariables>({    query: GetRepoId,    variables: {      owner: "blimmer",      name: "benlimmer.com",    },  });
  if (!result.data.repository) {    throw new Error(`Couldn't find repository id!`);  }
  return result.data.repository.id;}
async function starRepo(repoId: string) {  const result = await githubClient().mutate<AddStarMutation, AddStarMutationVariables>({    mutation: AddStar,    variables: {      starrableId: repoId,    },  });
  if (result.errors) {    throw new Error("Mutation failed!");  }
  console.info(`The repository now has ${result.data?.addStar?.starrable?.stargazers.totalCount} stargazers!!`);}
async function main() {  const username = await whoAmI();  console.info(`Your github username is ${username}`);
  const benLimmerDotComRepoId = await getBenLimmerDotComRepoId();  await starRepo(benLimmerDotComRepoId);}
main().catch((e) => console.error(e));
Note that we’re now calling getBenLimmerDotComRepoId() instead of hard-coding the value. TypeScript is also helping us
make sure we have a null check, in case the repository can’t be found. That information from TypeScript reminded us to
add this block of code to ensure the repository could be found from the API call:
if (!result.data.repository) { throw new Error(`Couldn't find repository id!`);}Let’s run the code:
GITHUB_TOKEN=PASTE_YOUR_GITHUB_TOKEN_HERE ts-node src/index.tsYour github username is blimmerThe repository now has 7 stargazers!!The output is the same, but we’re now dynamically querying for the repository ID before we call the AddStar mutation.
Checkpoint
If you ran into any problems following the steps above view Checkpoint #4 on GitHub.
Conclusion
As part of this tutorial, we created a project to interact with the
GitHub GraphQL API. By using
graphql-codegen, we were able to add TypeScript types to make interacting with
the API easier and safer.
Because @octokit/graphql-schema is
automatically updated any time GitHub GraphQL schema is
updated, we can simply update the package and ensure our TypeScript still compiles.
npm update @octokit/graphql-schemaWithout generating types from the schema, GitHub could change their schema in a way that breaks our code, and we wouldn’t know until runtime.
I hope this walkthrough was helpful and helps your next integration with GitHub a little bit more fun!